My friends asked me to make them something for their wedding cake. The cat has little roller skates.


All-Purpose Girlsplaining PNG
I made this in honour of a groundbreaking study confirming that personal computers were marketed at boys. Duh. We needed a study for that?
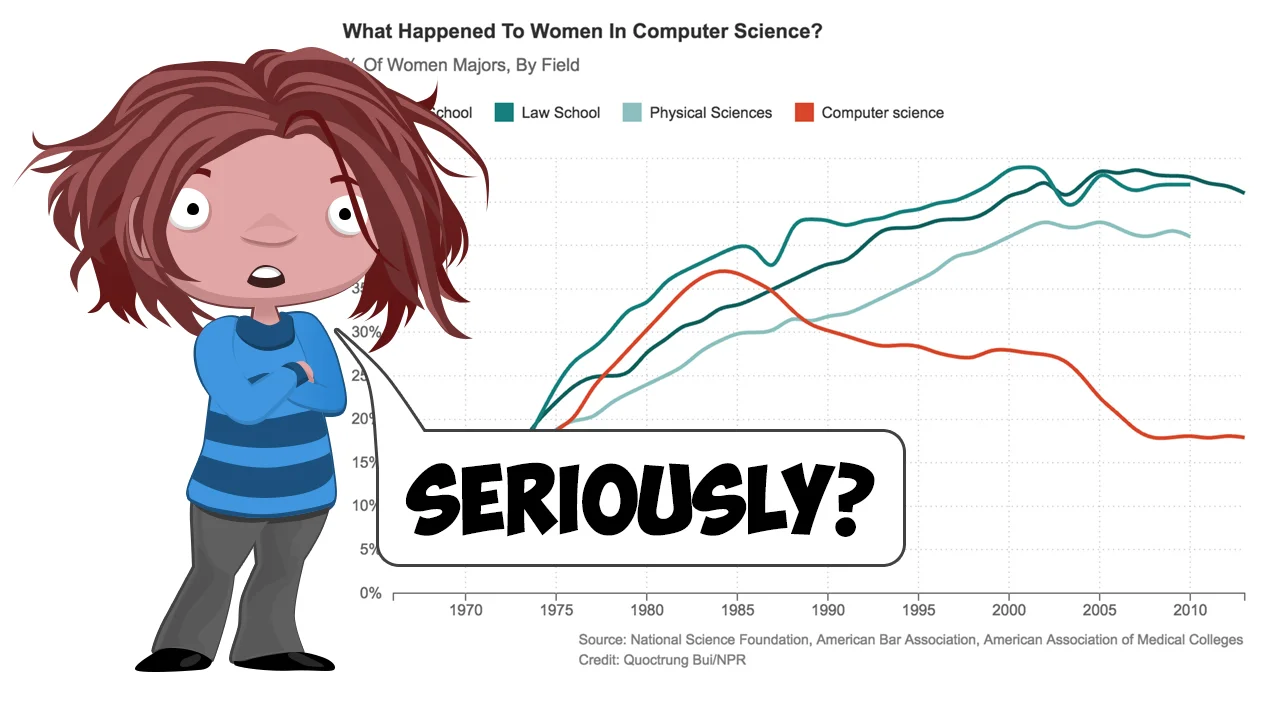
Furthermore, I think the world needs an all-purpose girlsplaining png that can easily and conveniently be plastered on all future declarations that have always been completely obvious to 50% of the human race.
In case you need a non-perpetuating version that's more badass, the link below includes the words 'No Shit!?!' instead:
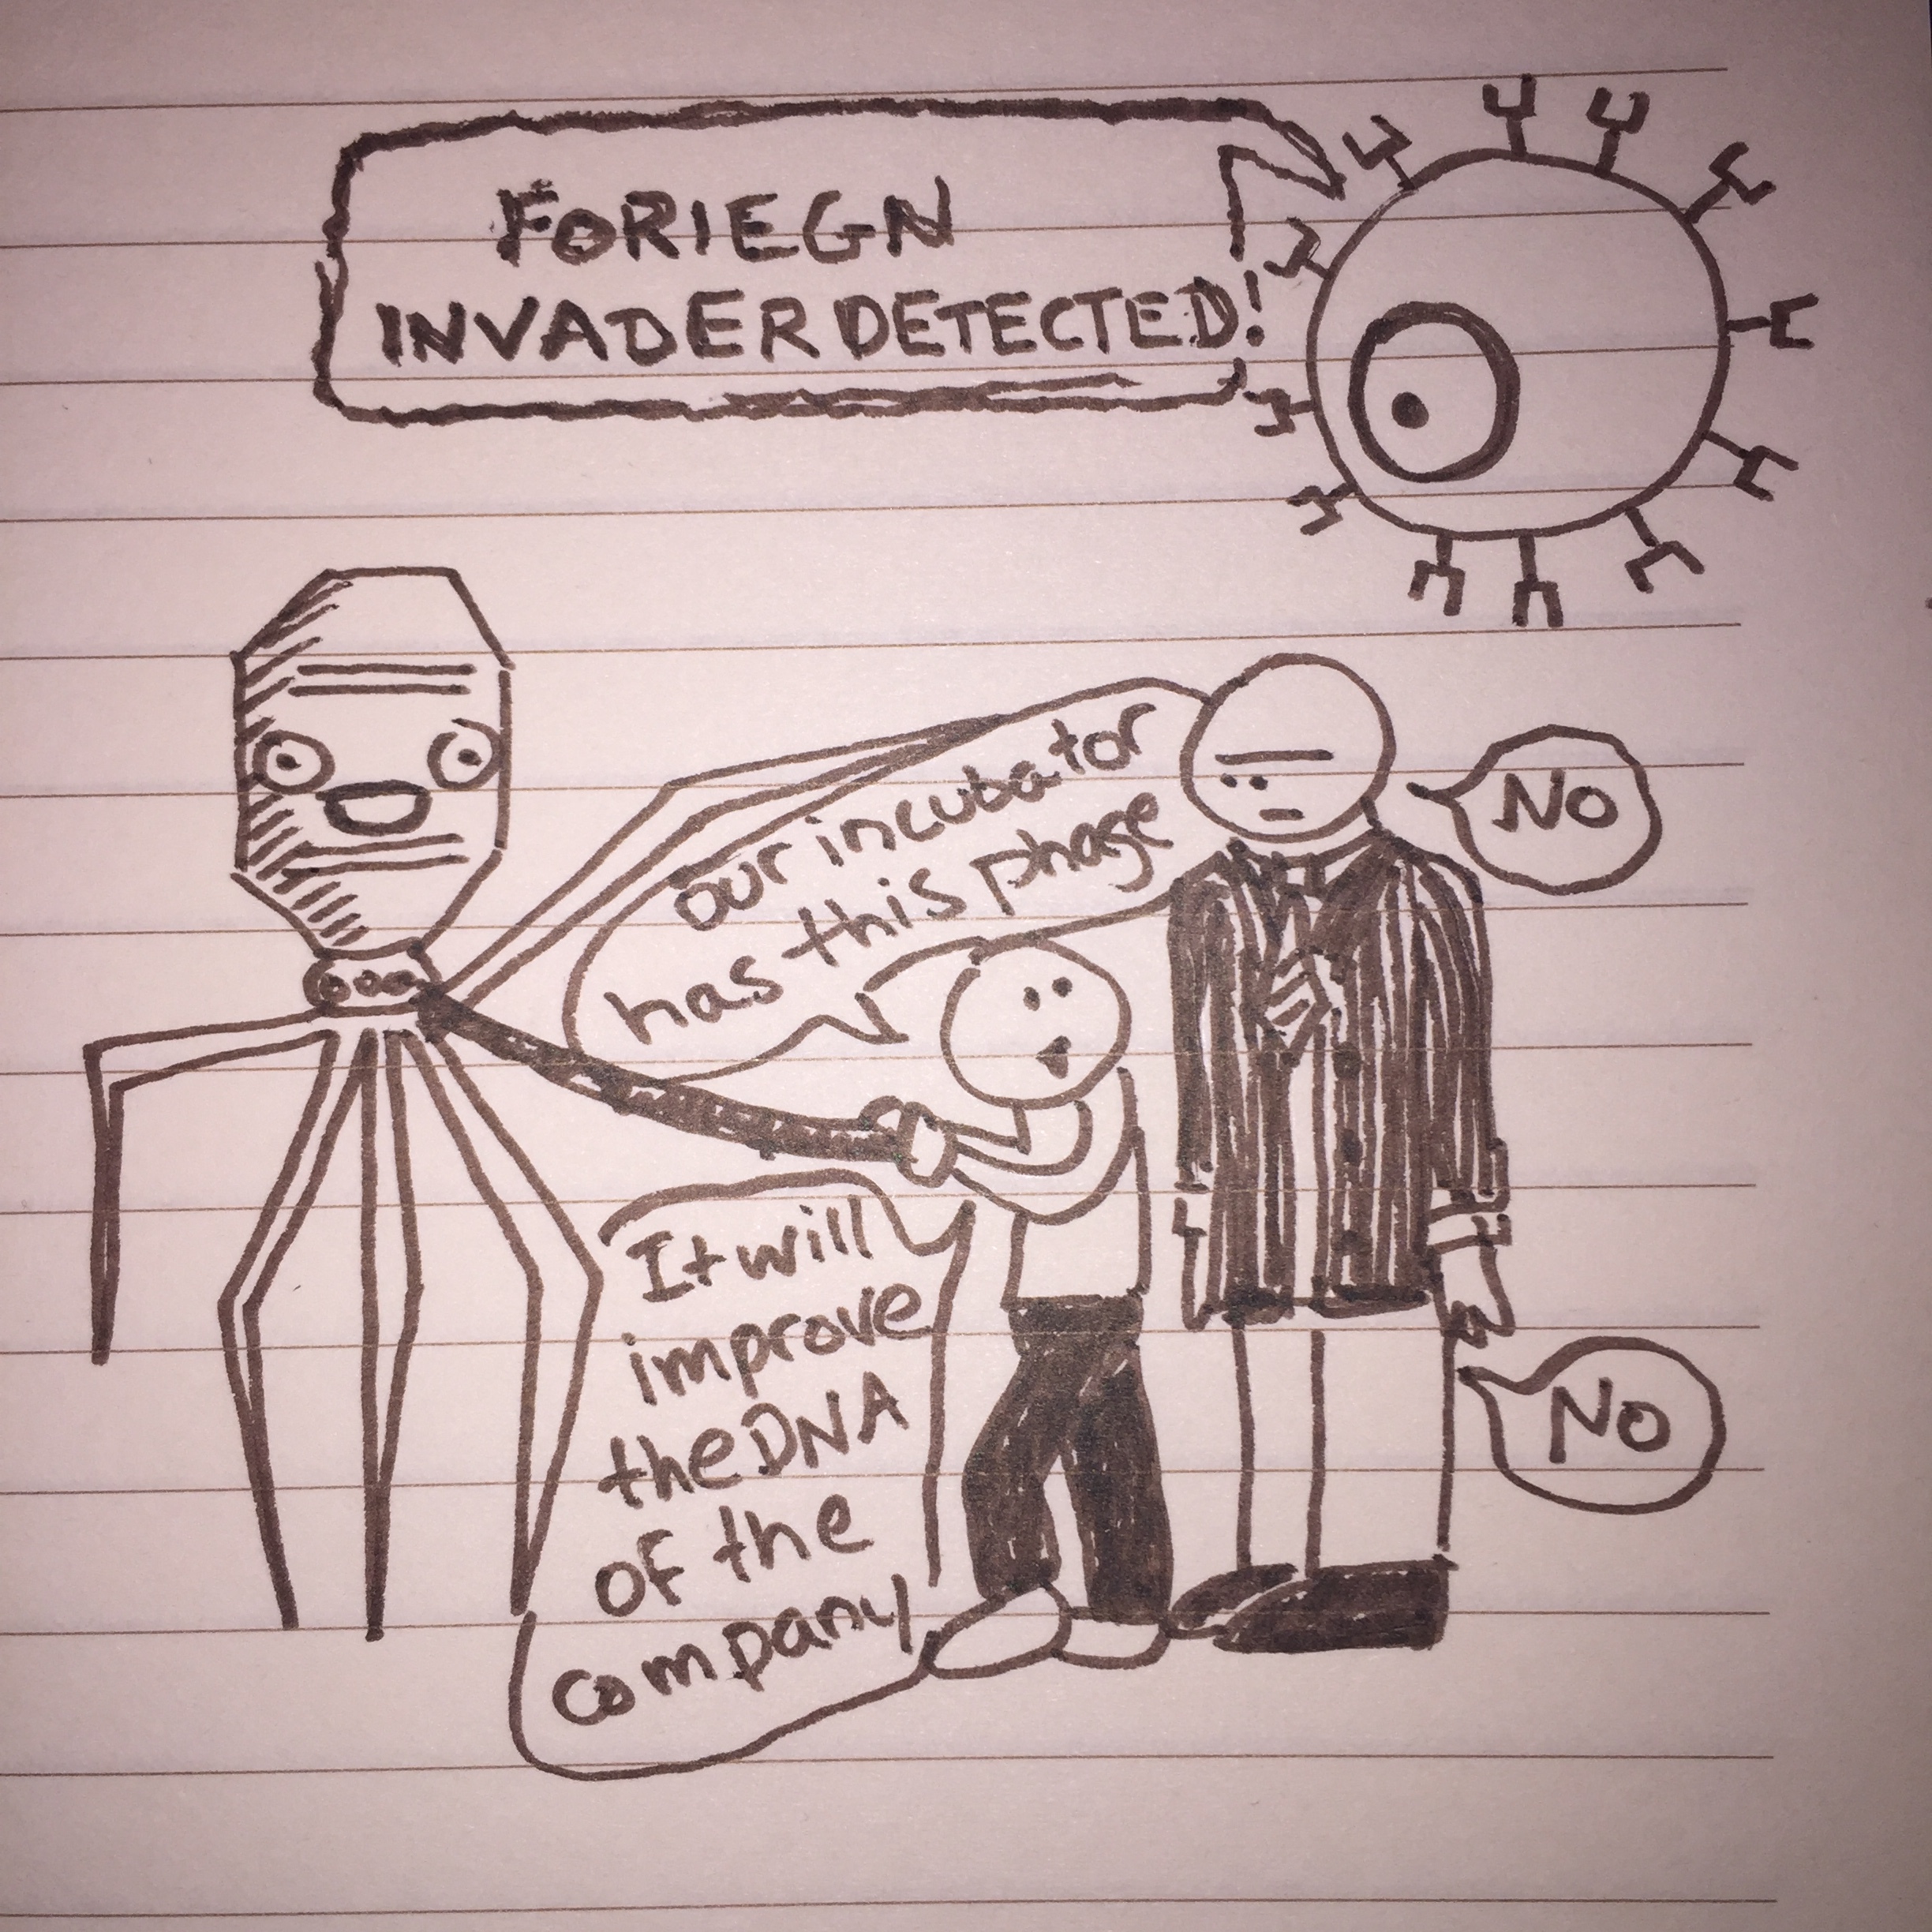
Wash Your Hands
Inspired by this tweet.

The perfect gift.
Inspired by this tweet.

Here's a rabbit I painted.
Sometimes it's just nice to paint a rabbit. This little guy's standing at the edge of the water trying to use the branches behind him to make his reflection look like a jackalope. He just wants to take a nice selfie.

Swamp Bunny - watercolor and ink on canvas.
The three golden rules of interactive display design. →
There are obviously all kinds of factors that influence how a display is designed, and how it works. These include things like lighting requirements, durability, intuitive user experience, target audience, localization, accessibility… the list is super long.
However, there are three simple rules that I’ve discovered must be followed in order to ensure that any interactive display is as successful and engaging as possible.
Read MoreThe Making of Chupacabra
For the past few years, I've been following a young artist named Santani. She's a Russian woman, born in 1990, who's been making realistic fantasy animals since she was 14. Her work is unbelievably good. Her fantasy animals are so realistic, they're often used as thumbnails for clickbait articles.
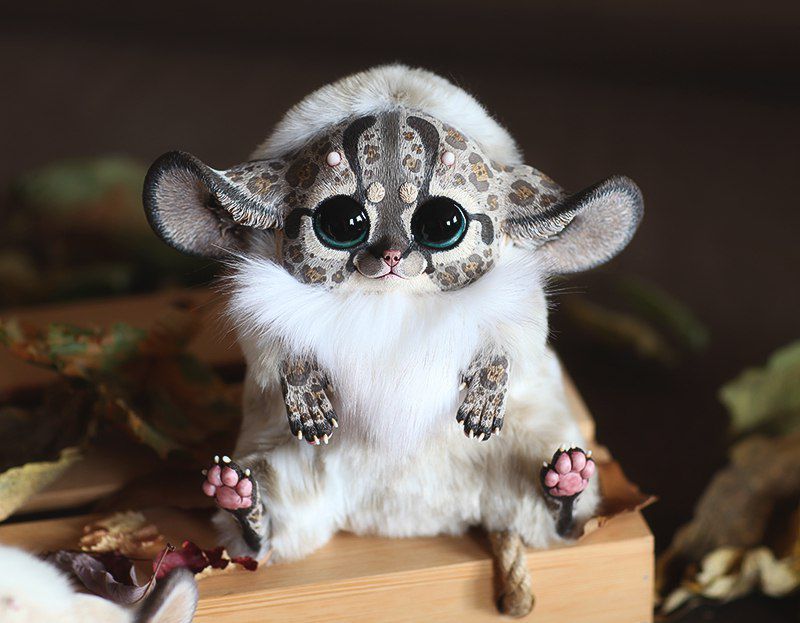
I've been deeply inspired by her work, and as a result I've decided to make some of the weirder creatures I draw into stuffed toys. Ultimately, I'm hoping to create a programmable animatronic animal, but for my first attempt I just wanted to try a few techniques and get a feel for some different materials. It will take a long time before I develop the skills to match Santani's incredible attention to detail (if I ever do), but with time I'm sure I'll find my own quirky style.
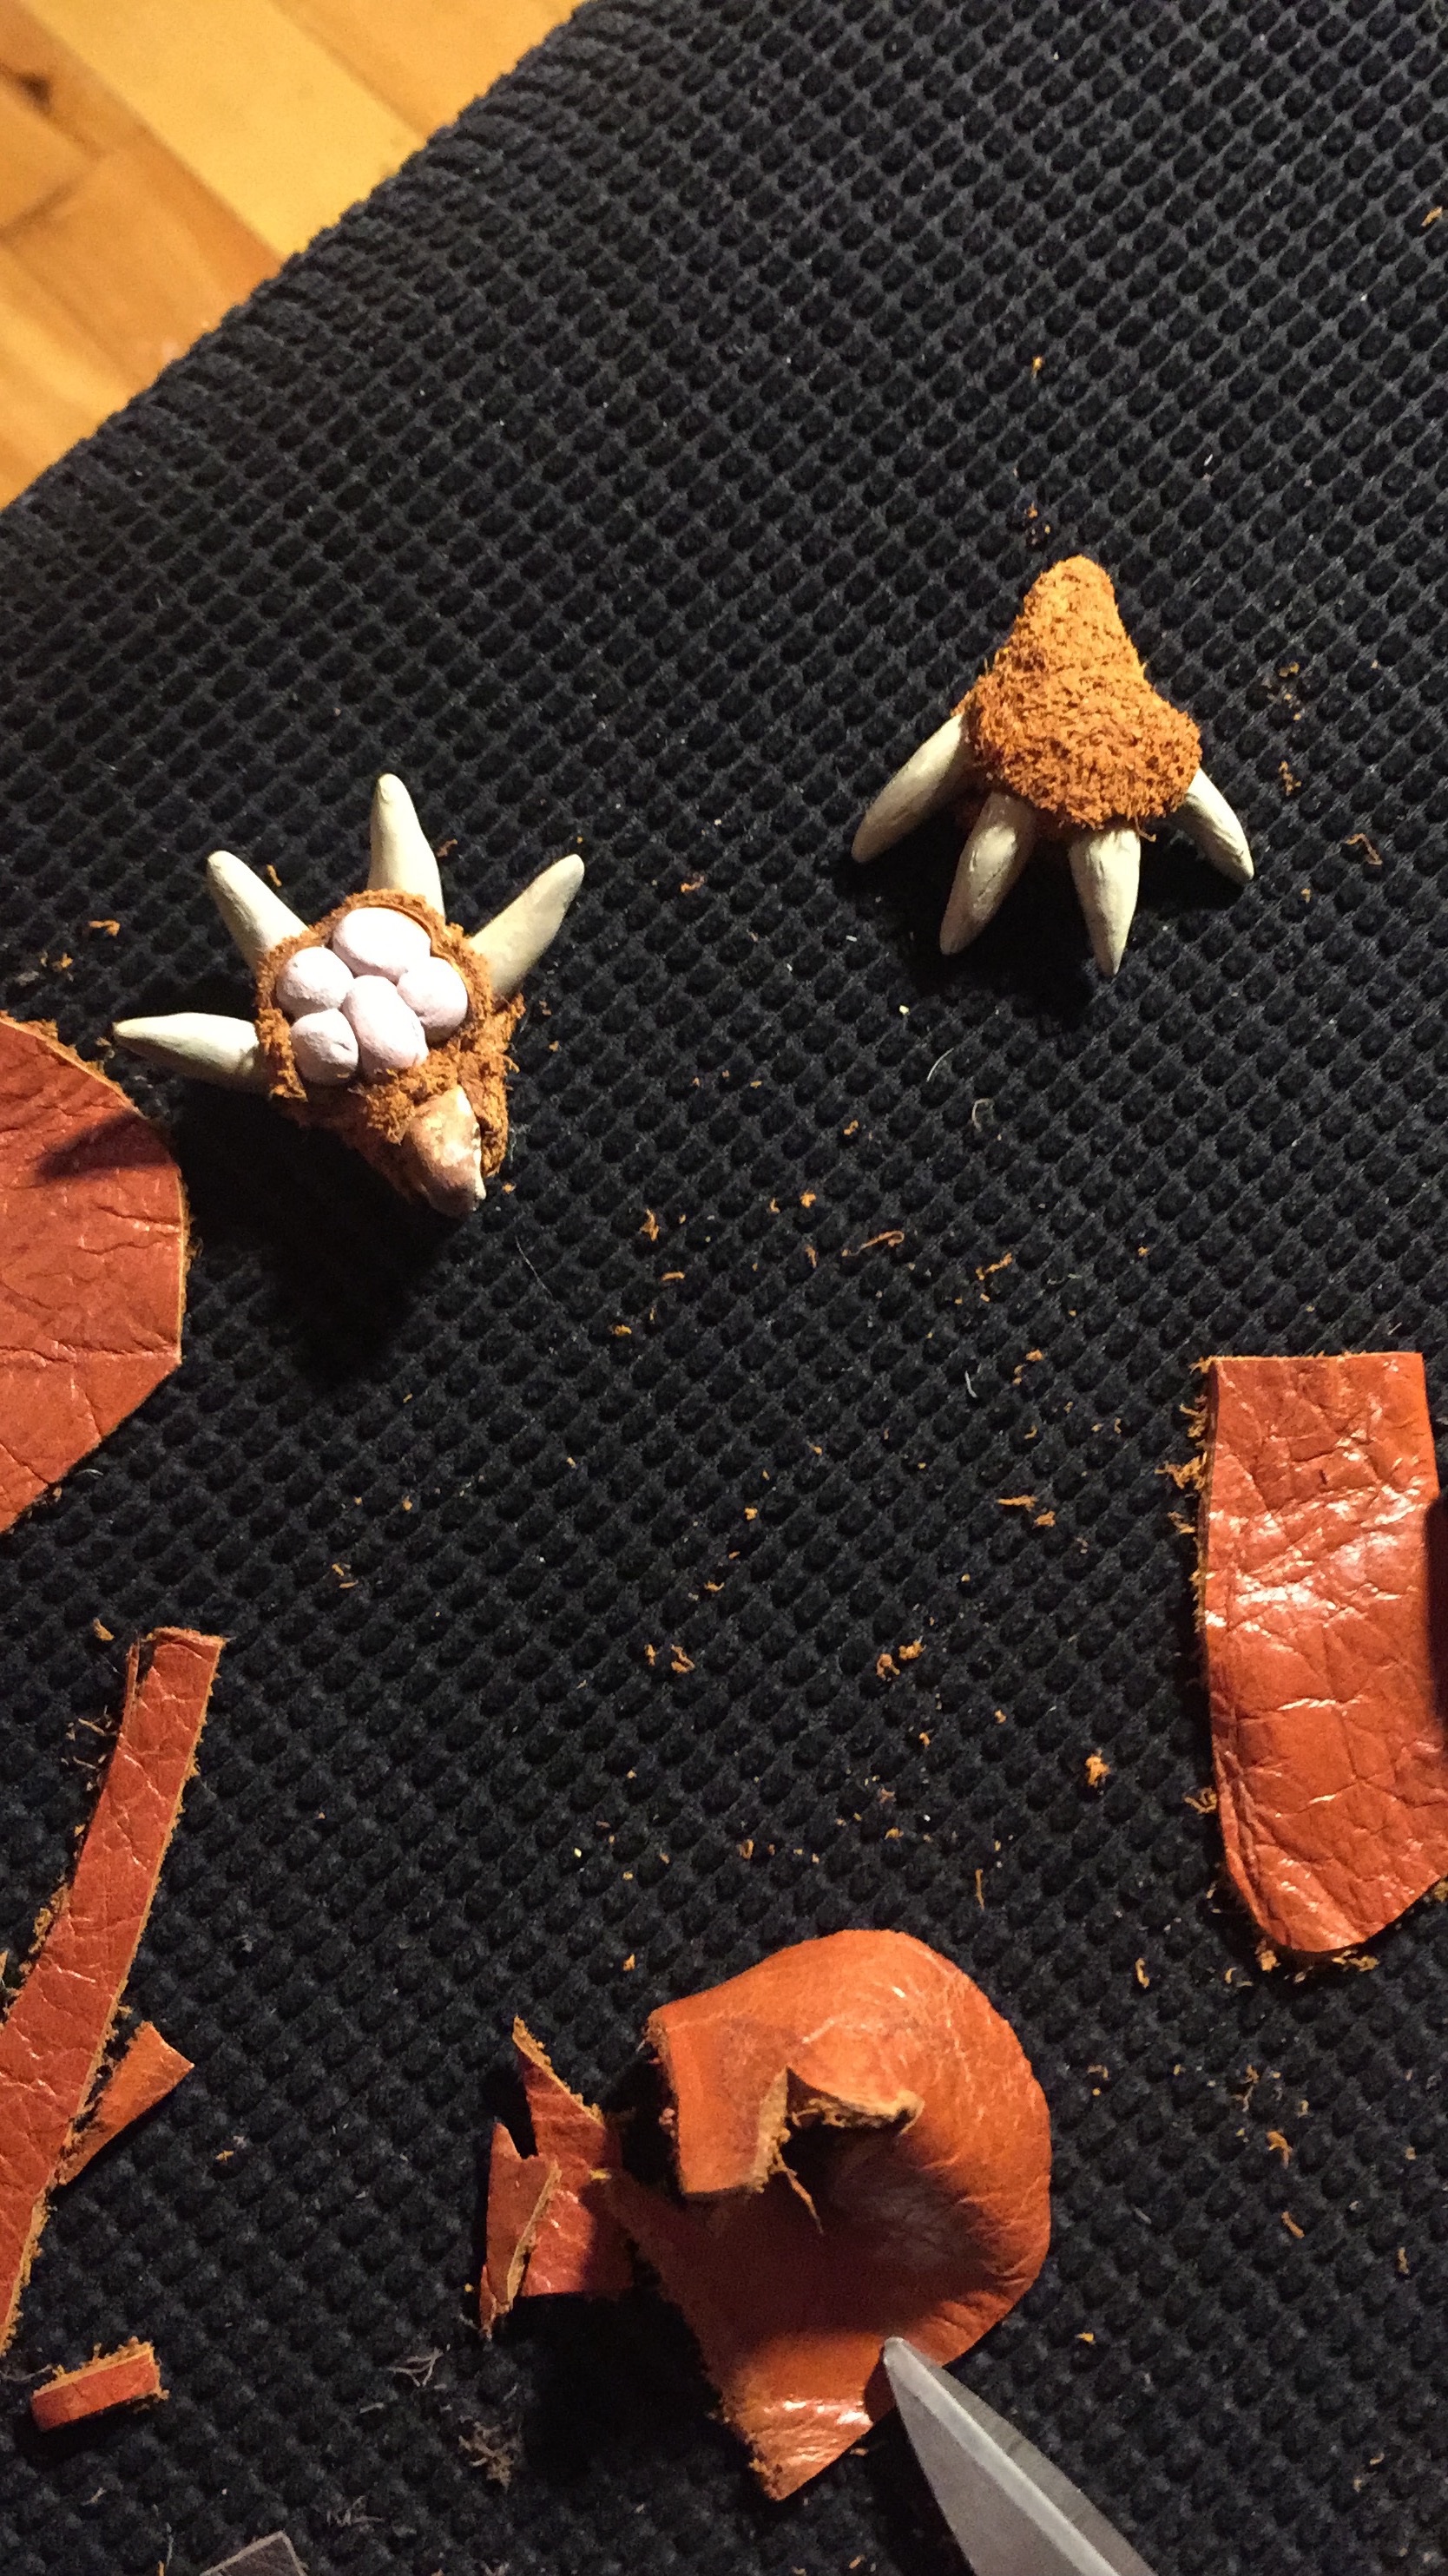
The first thing I did was craft claws, teeth, and a nose from Sculpey. This is a material used a lot in the construction of fantasy art dolls, because of its incredible versatility and the way it holds paint and other coatings.
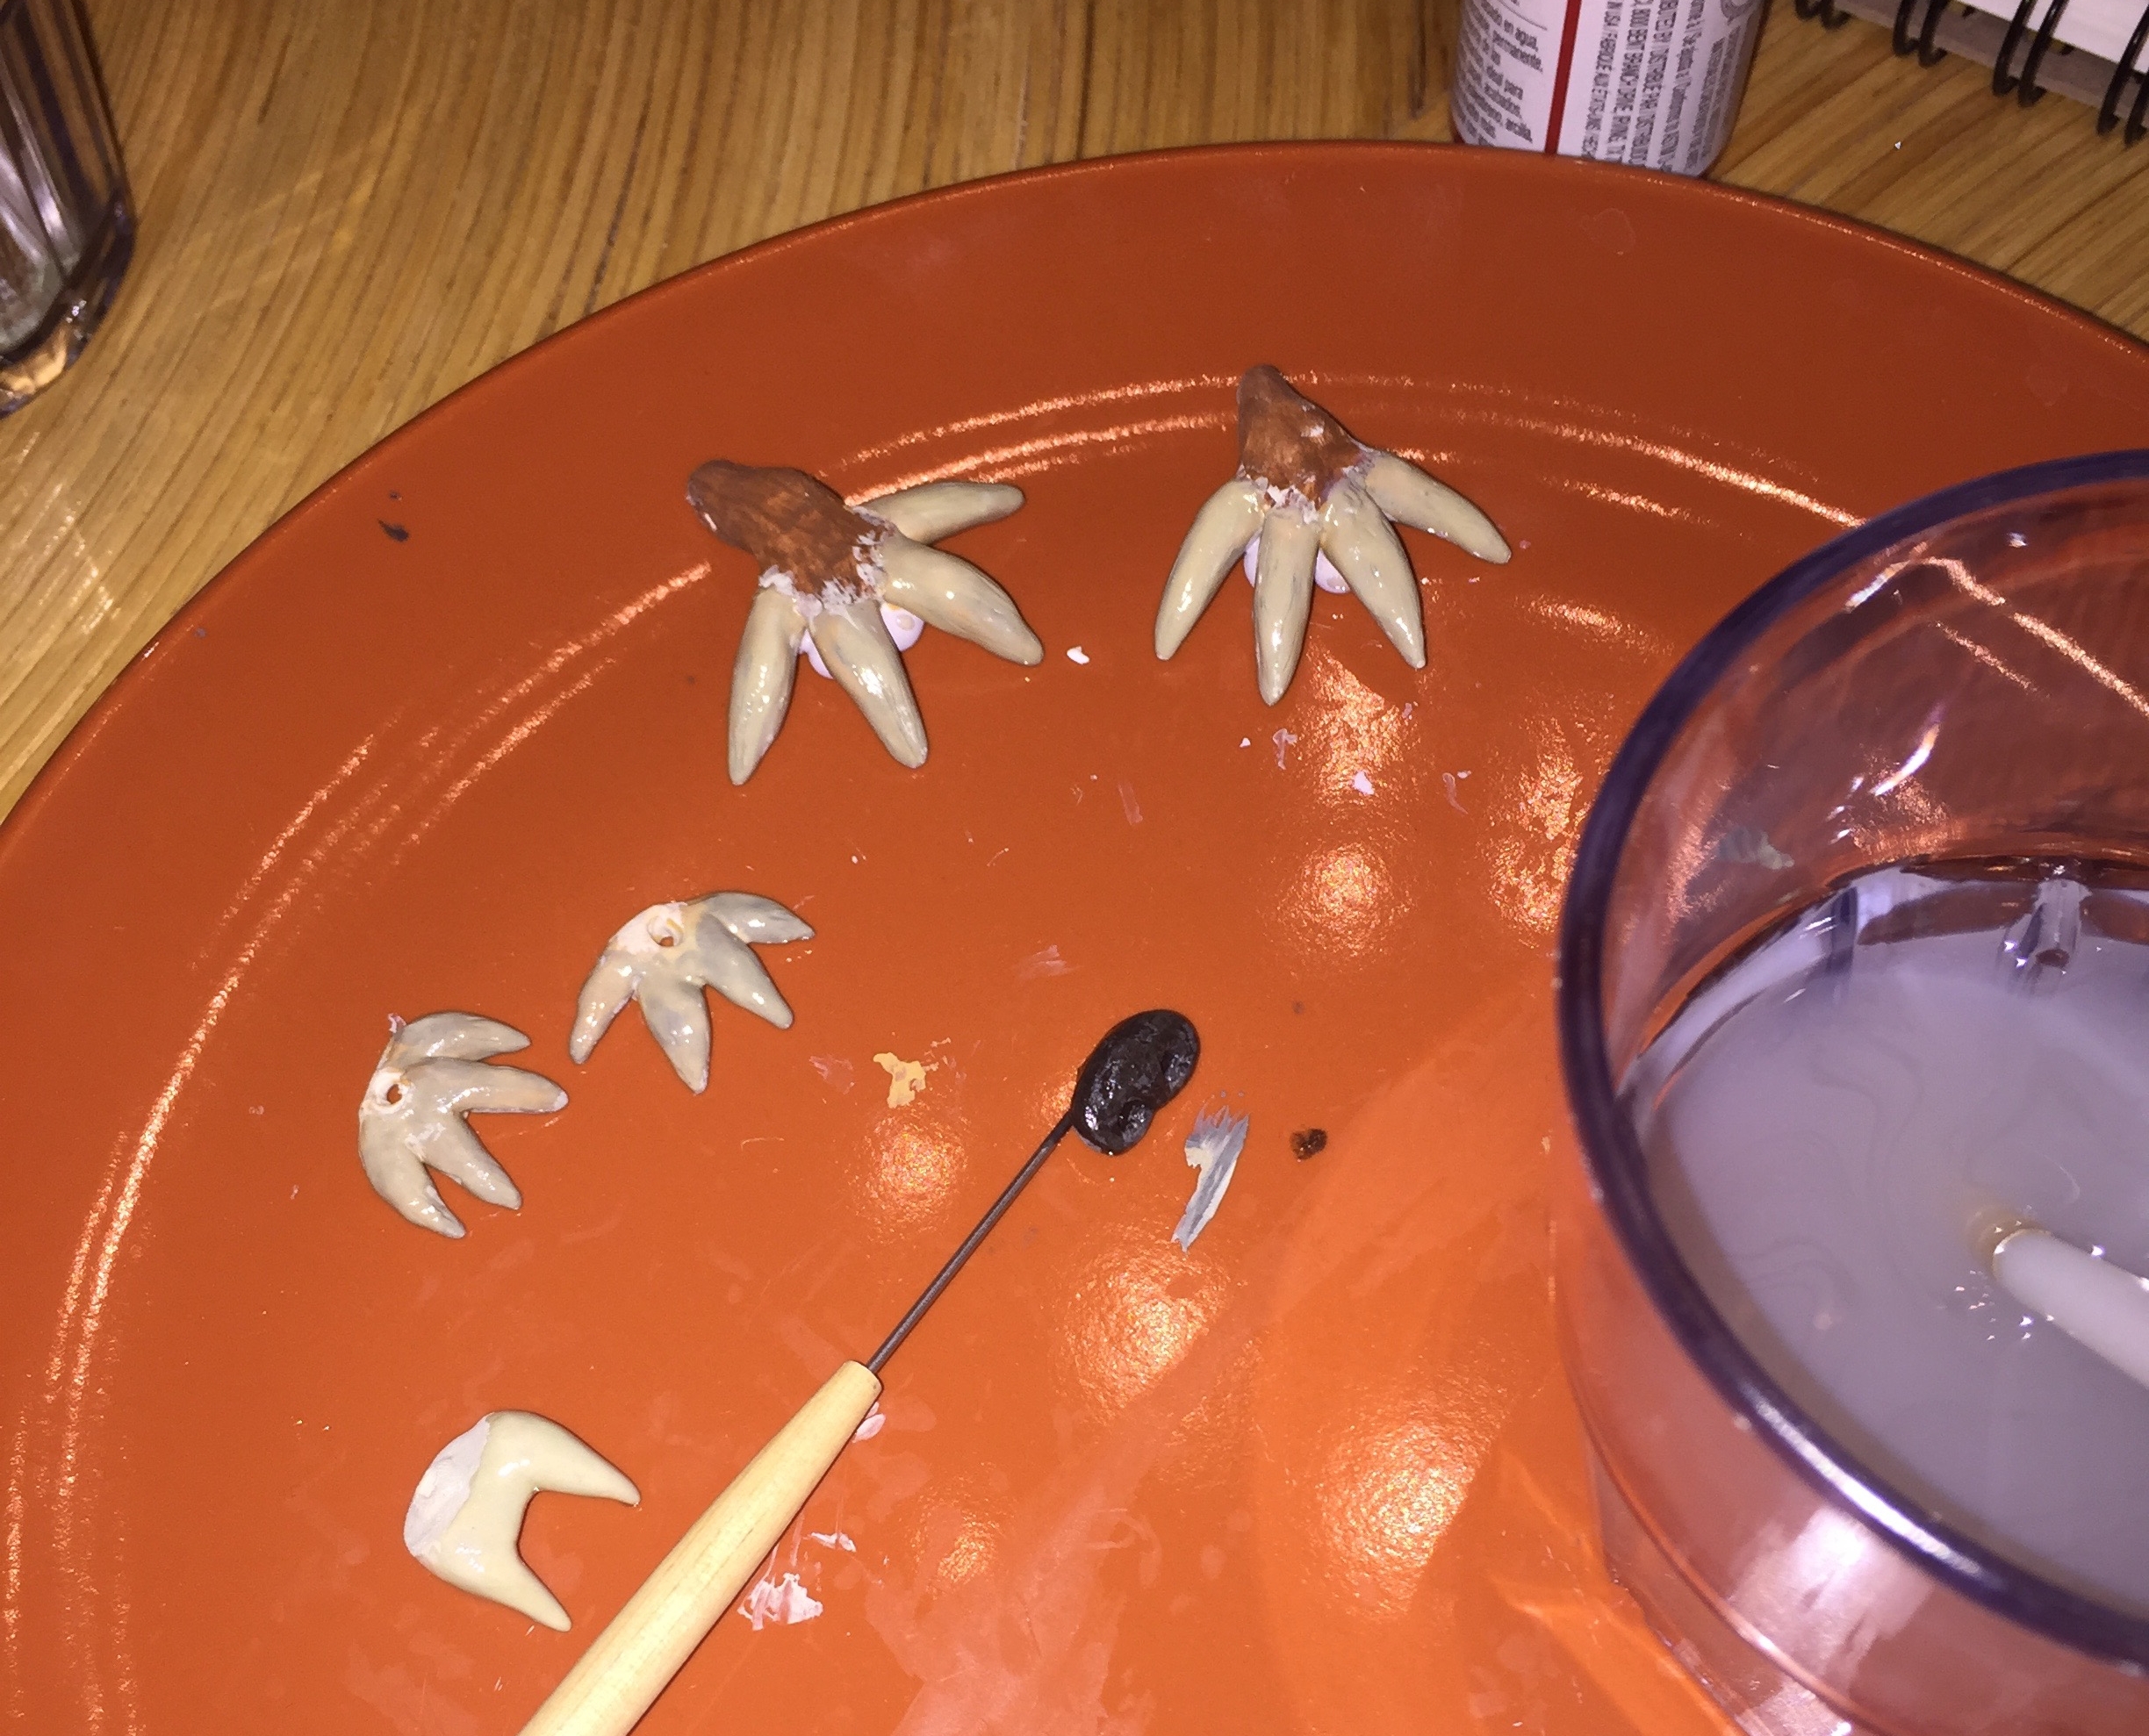
Rather then try to make super detailed pieces, I opted for simpler, larger claws and teeth, and chose to sew the face instead of moulding it. I used acrylic paint and nail polish to coat the finished pieces. Each Sculpey piece had a single hole to help me secure it in place later on.
The claws for the hands were simply four little spikes, but I added little toe pads to the back feet because toes are so freaking cute.
At this point I still had no idea what the actual creature was going to look like in the end. I was just making parts.

One of the things I wanted to do was paint my own glass eyes. I spent a lot of time on Ebay and Etsy looking at glass eyes, but in the end I ordered simple, half-dome glass cabochons (this word was super useful in Google searches).

Since painting directly on glass is a bit tricky, I made little disks of Sculpey that were the same size as the glass, and painted those. I included a little wire loop at the back of each disk, to help me secure the eyes later. I used the same acrylic paint and nail polish, and attached the glass to the Sculpey with super glue.
I decided to use leather scraps to make my little friend's body. I found some leather ends at a nearby craft store, and used the more textured parts to attach leather to the feet using super glue. At this point, I learned how effective super glue is on leather - it's got basically the same impact on leather that it has on your skin. After glueing my fingers together a few times, I got the hang of it.

I glued the leather really carefully around the hands and feet, and tried to figure out how to attach the feet to a body. I still wasn't sure how it was all going to fit together, but it was fun making it up as I went.
I used a simple leather awl to sew the leather scraps, and added some fun fur for accents and a tail. Fun sidenote: I was travelling overseas while I worked on this part, so this little animal came together across several countries. The picture below was taken in Singapore.

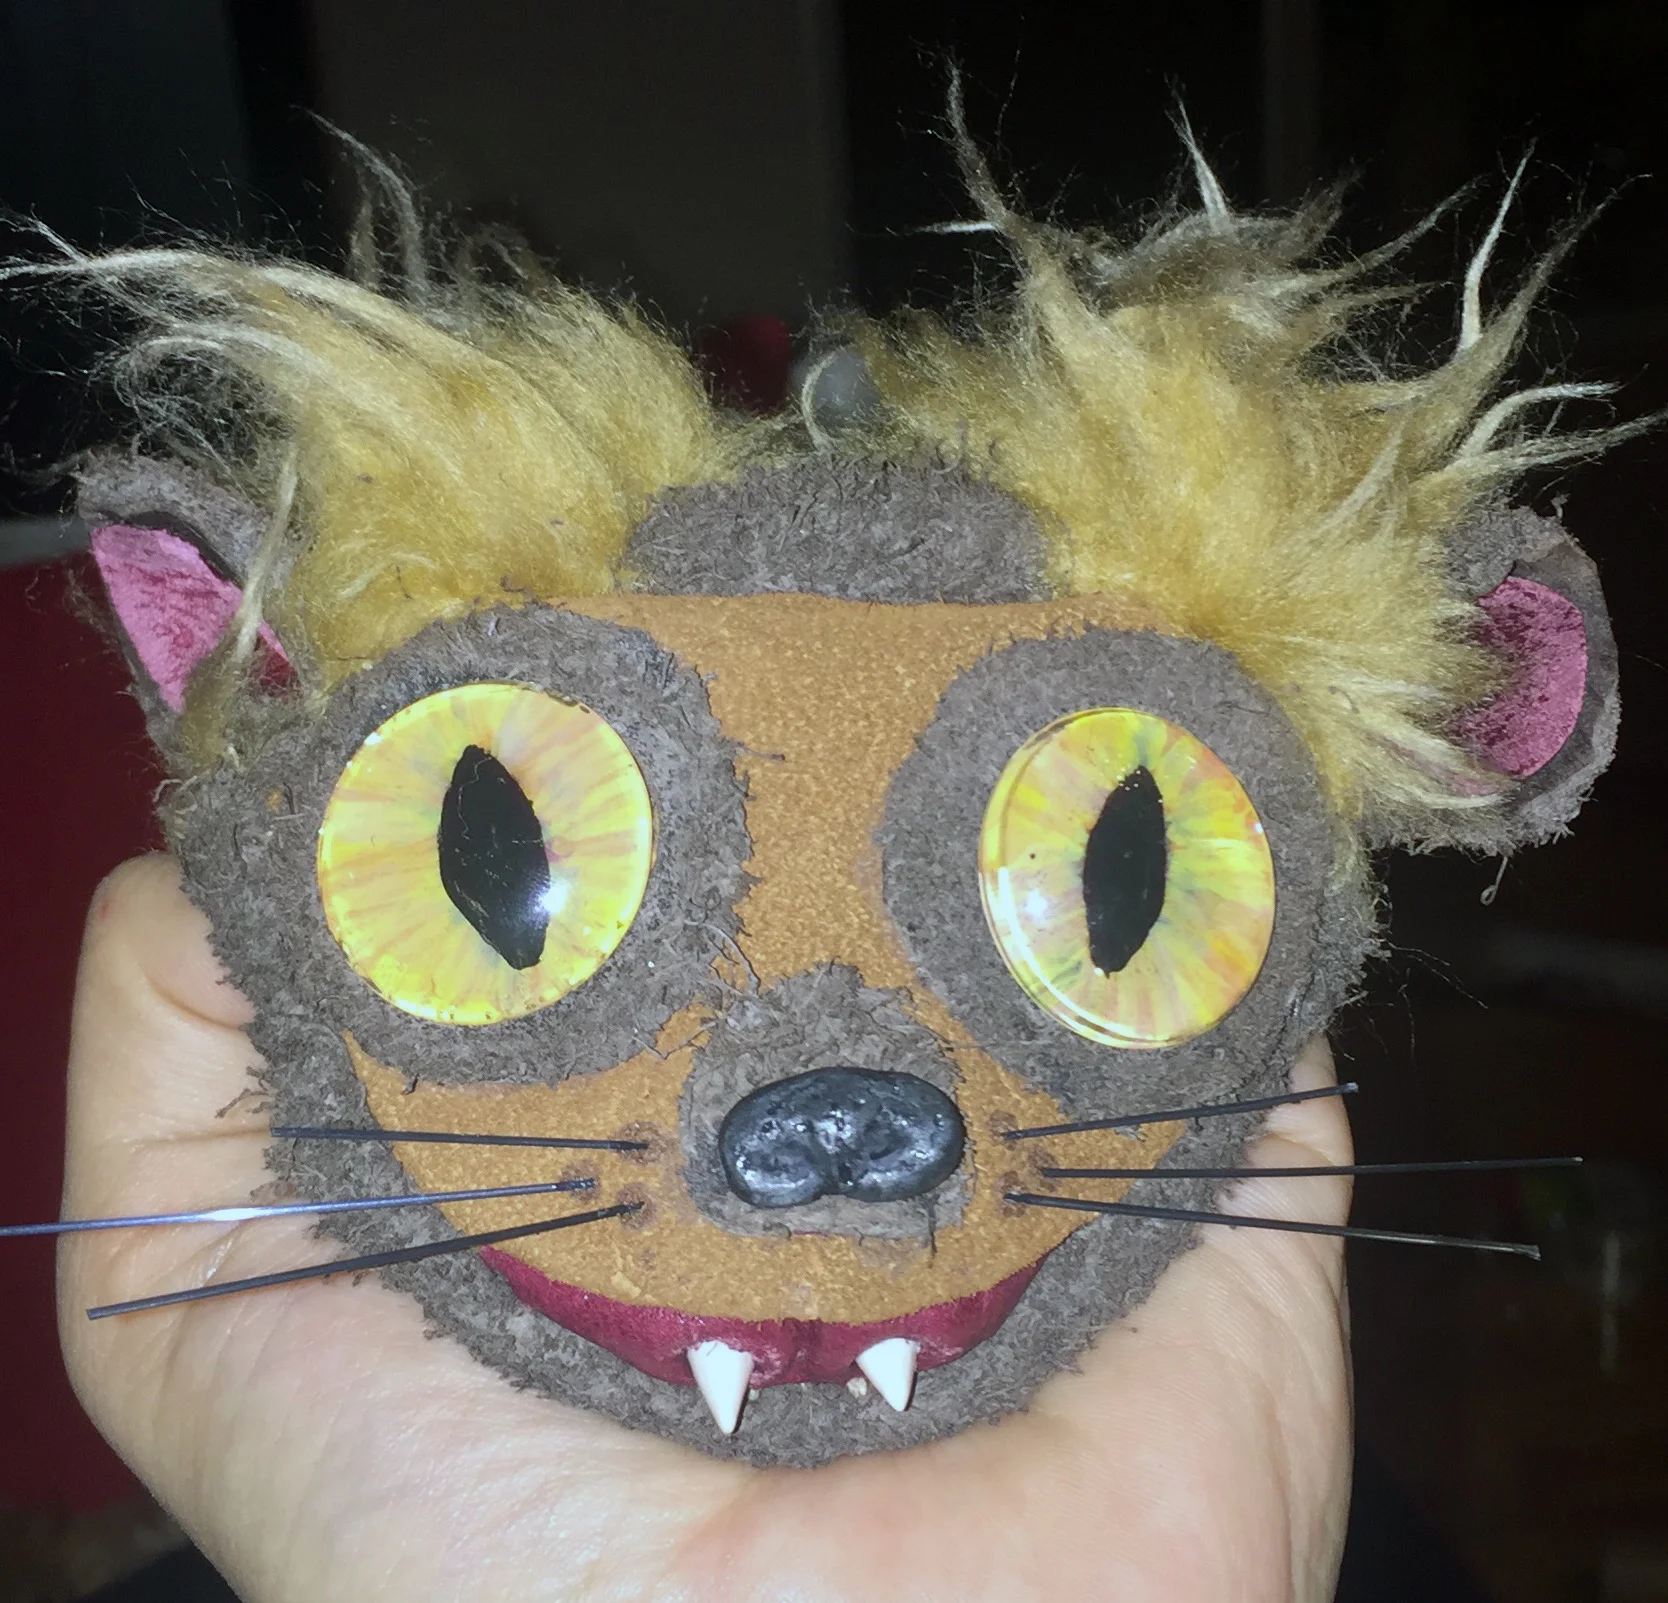
Once the arms and legs were attached, I started slowly working on a face. This was the hardest part. I still wasn't entirely sure what I wanted the face to look like, so I cut out a lot of shapes and arranged them as I went. A lot of super glue was used for this part, too.

I discovered that you can easily mould leather into simple shapes by soaking it in super glue, which is how I made the ears hod their shape. I'm not sure how well this'll hold up to time... maybe it'll weather badly. But it was pretty great for making ears that held their shape. I also scraped the leather inside the ears a bit to give his ears some depth. Finally, I used fun fur to give my little guy a nice hairstyle.
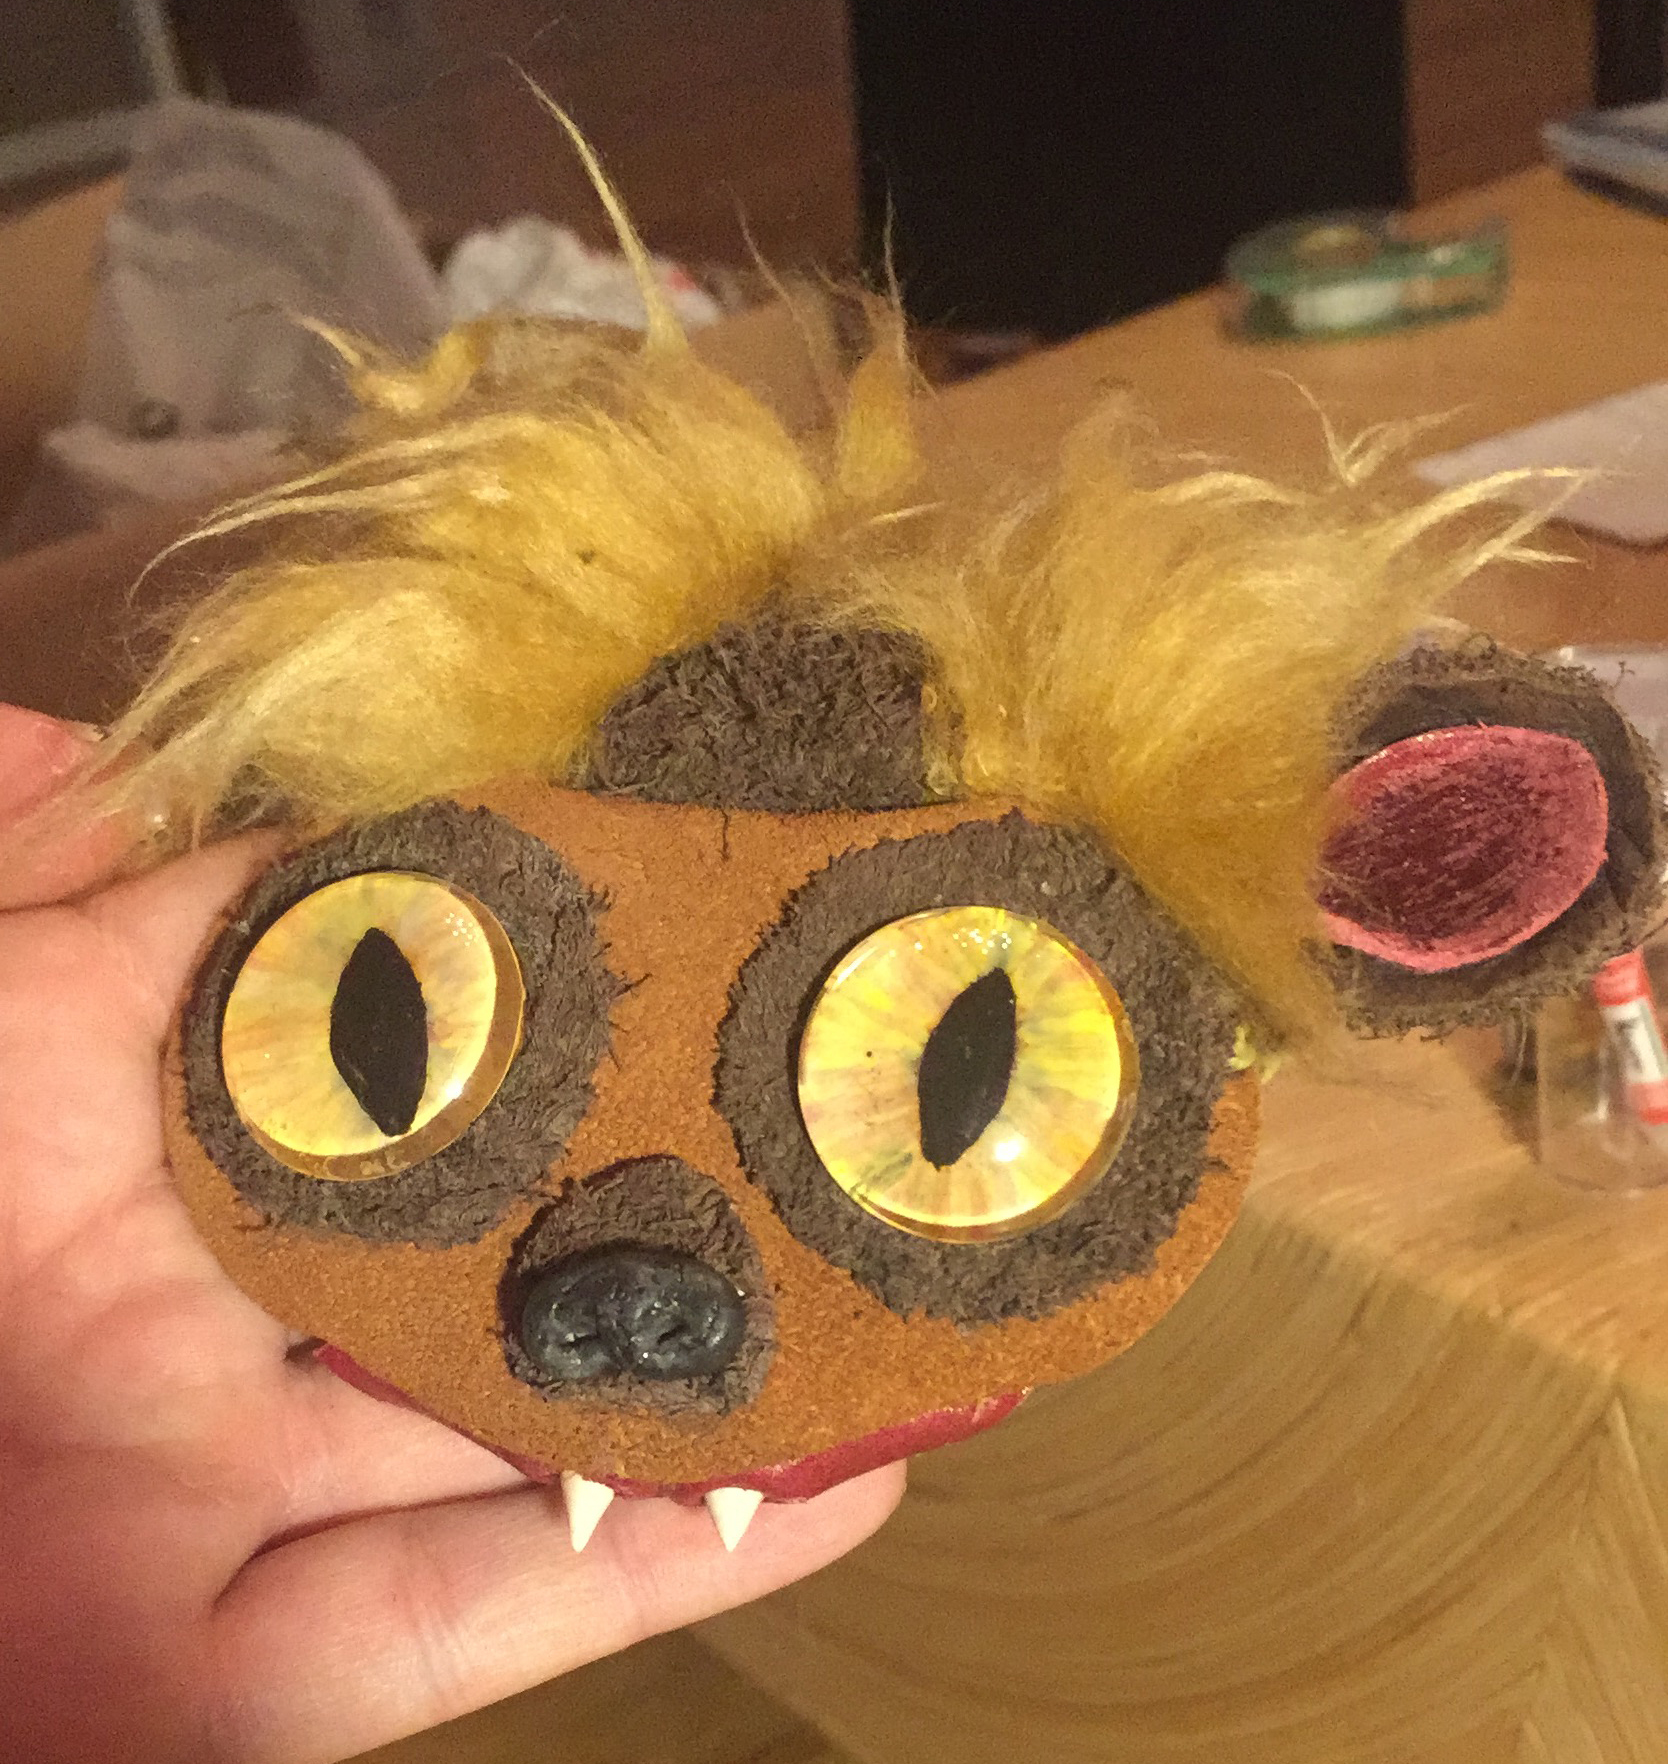
Making his head the right shape was pretty challenging, and I'm not sure I succeeded... in the end his teeth stuck out a lot more than I wanted them to. But I did succeed in adding firmly secured whiskers (harvested from my broom).
At about this point, I named this little guy Chupacabra, after the legendary goat sucking creature from central and south america. One of the fascinating things about this legend is how recent it is. Until I chose this name, I assumed Chupacabras had been part of a rich human mythology for hundreds of years, but this particular legend is less than 20 years old.
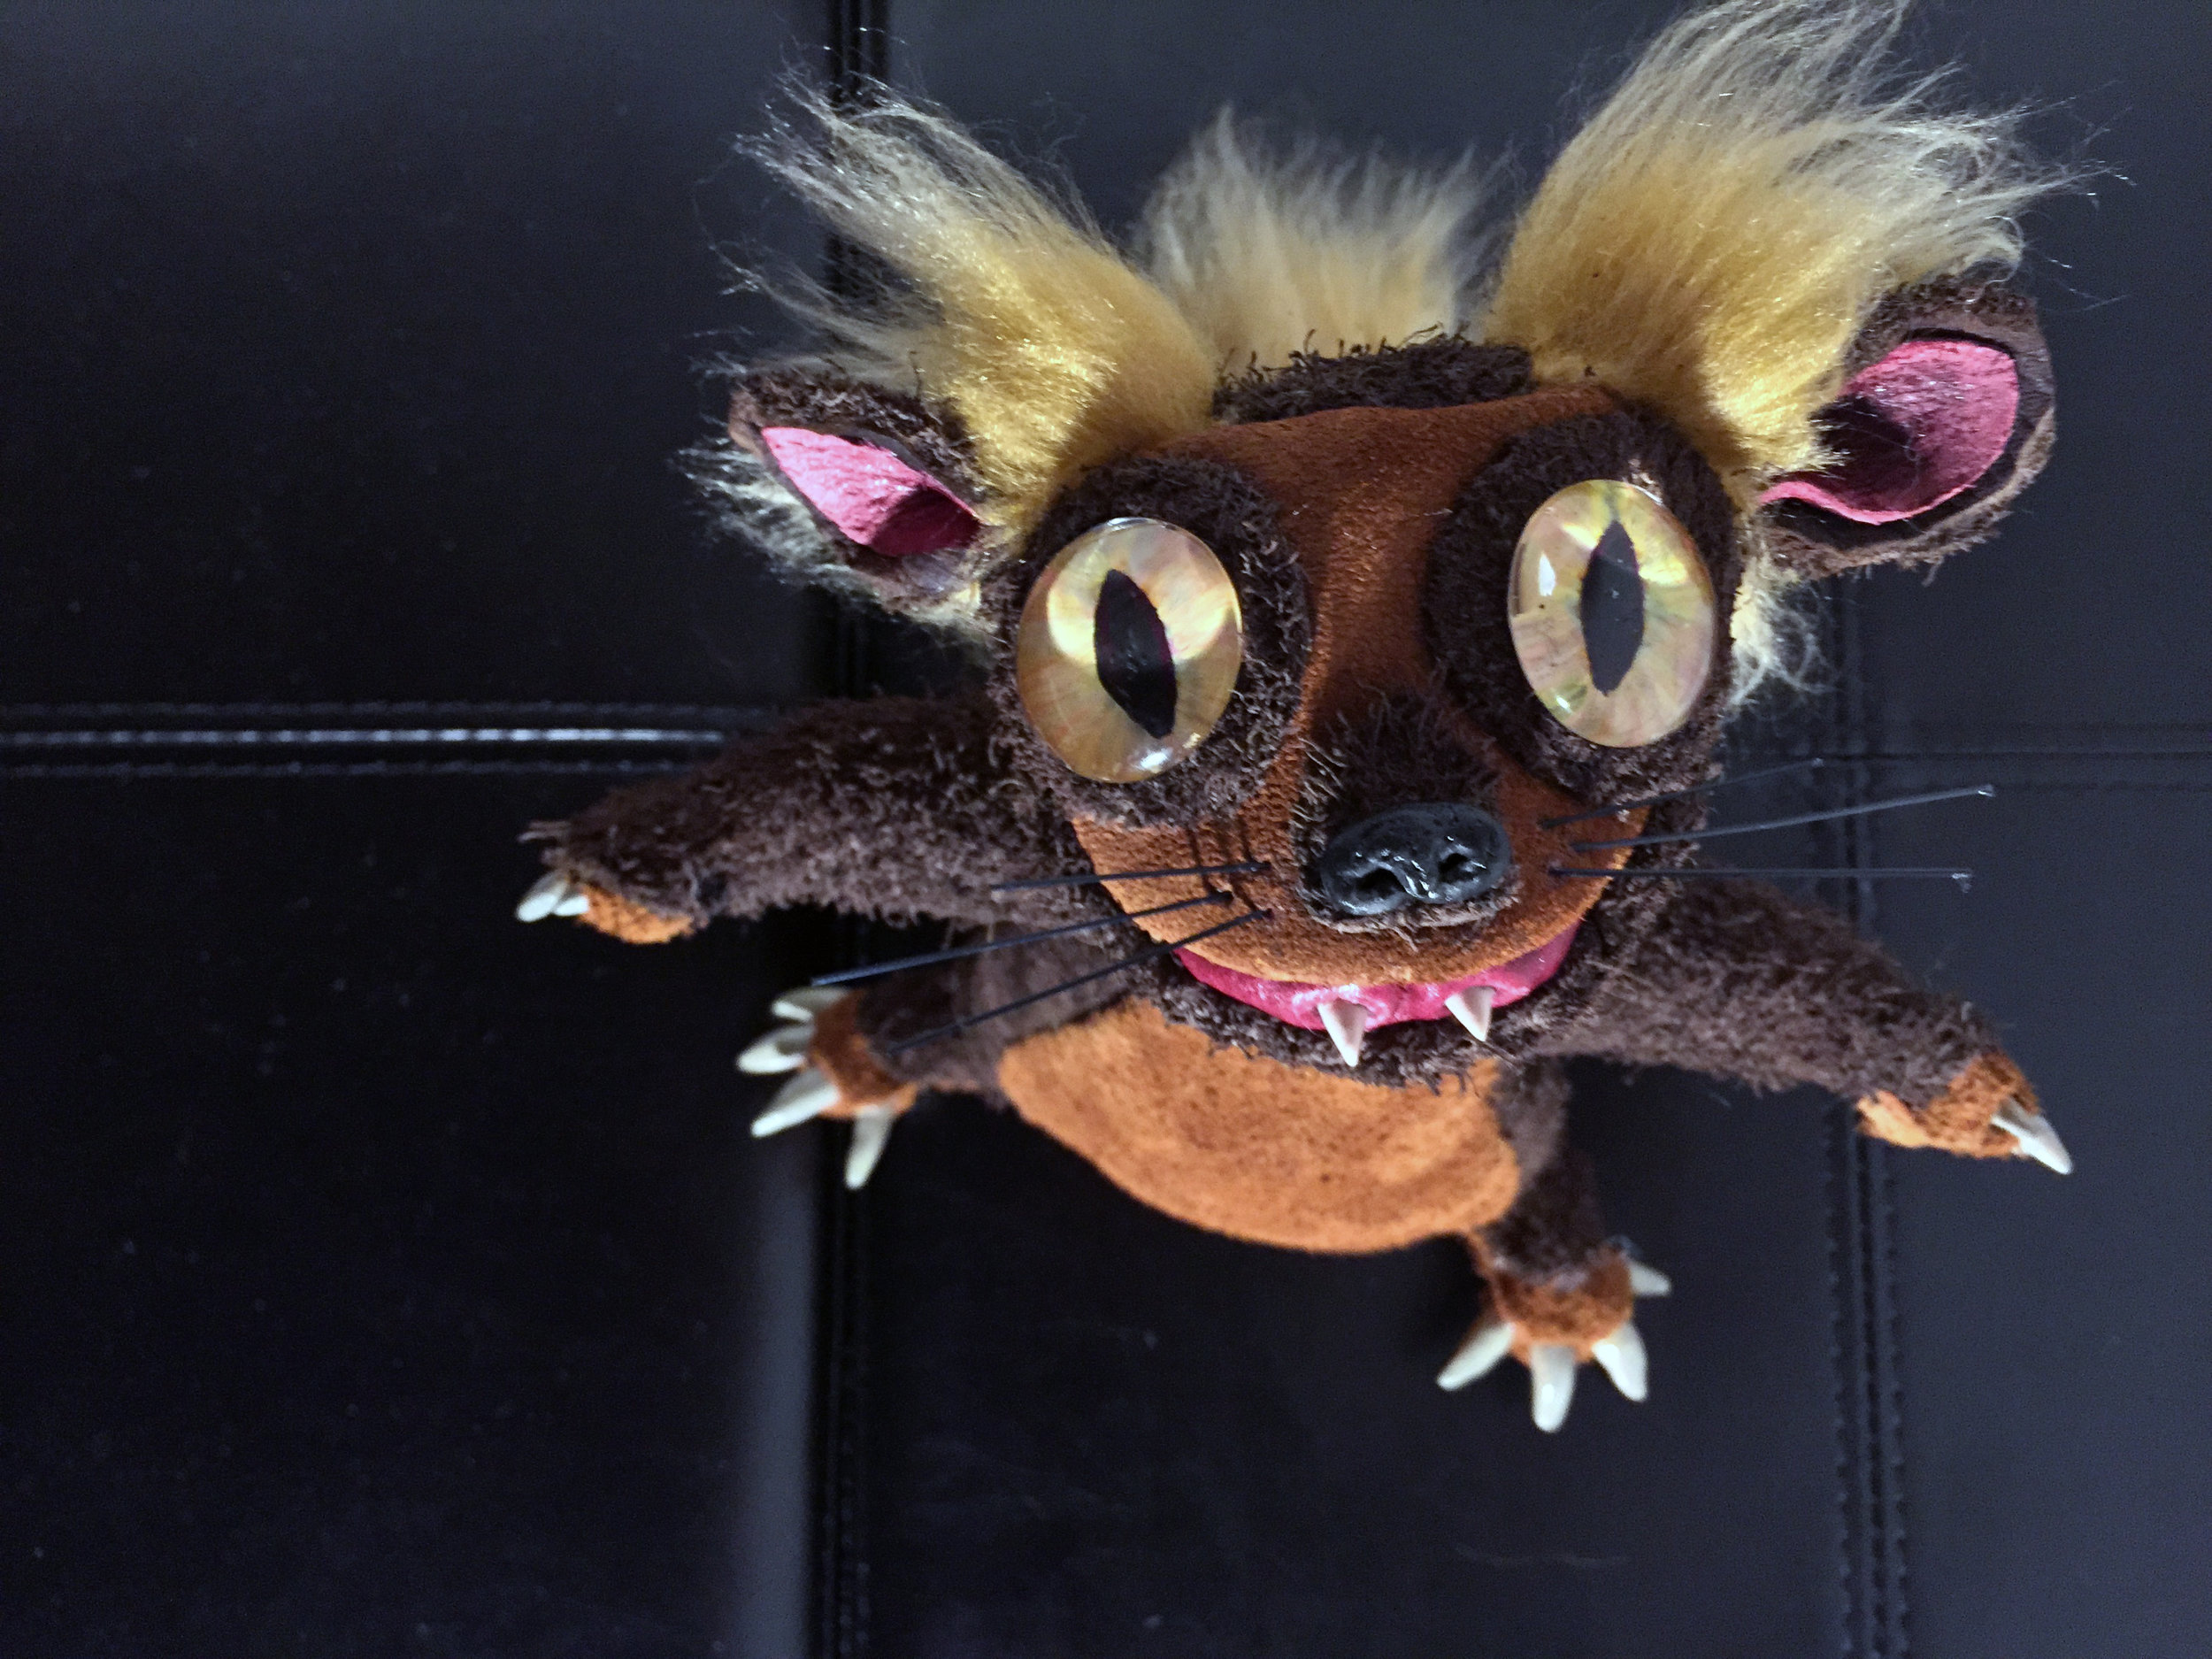
This is the finished product. Chupa's neck is a little crooked, and he looks like he always needs a hug. I'm really proud of how solid he is, even if I had to stuff his butt with pennies to make sure he could sit up, and there are a few stitches showing. I can't wait to make the next one. :)

TEDx Toronto summed up in sketches
I doodle to remember. But I don't always remember to doodle. So today, I made sure to bring a pen to TEDx Toronto 2016. Here's what I learned.
Opera Singing Is Weird

With instructions like 'imagine you're spreading angel wings and breathing into an inner tube, and raise your voice to the sky', it made sense to hire a kinesiologist to develop terms and language that can be applied to actual muscle groups and posture.
Some Lizards Can Make Water From Dew In The Desert

And so can we. Nature can provide all sorts of inspiration when it comes to survival. The inside of the dew condenser tube doesn't actually contain lizards, (I don't think there'd be any flies left if it did), but the technology uses a lot of the same principles.
Different Generations Communicate in Different Ways... And All Of Them Are Good

Baby Boomers use oral communication and emotional problem solving, and they rule at it. Gen Xers love visual stuff for self-management, like whiteboarding and decks (guilty as charged). While Millenials are all about technology, learned that everyone's opinions matter, and value actions over words.
Making Patients Come to Doctors is Often Unnecessary and Unsustainable

Vitality and companies like them are finding ways to support health diagnosis and management at home using wearables and mobile devices. This type of preventative care has the potential to save billions of lives and dollars. (It's not actually a drone, I just think a drone that follows you to tell you everything is fine is an awesome idea).
Open Science Should Be The Only Science

Why are we almost exclusively funding redundant studies for popular research subjects around the world? If the human race really wants to solve critical problems, we need to work together. Now more than ever.
Break for Meditation Music

This is the part where I reached enlightenment.
The Gaming World Still Sucks At Diversity (But It's Getting Better)

There are more and more games that offer characters who represent a wider audience, and show them in positive ways. This shit affects our culture. As consumers, it's our responsibility to support the good stuff and let development companies know if they're dropping the ball.
You're Probably a Hacker

In recent times, the term 'hacker' was co-opted by technologists, in particular to describe those who do nefarious things. But McGuiver is a hacker. And being a hacker is awesome.
Taking Freedom For Granted Ruins It For Everyone Else

In Canada, it's easy to enjoy the freedom to be outside the 'norm' (if that even means anything here). But in other countries, people get killed for it, or worse. Refugees often remind us to appreciate and protect our rights, and to support those who don't yet have rights.
It's Okay To Have a Conversation That's Entirely Questions

Is every question important? What is a waste of time? When was the last time you asked yourself why?
You Didn't Pick Your Name, But You Get To Own It

We make assumptions about people because of their names. Name privilege is a real thing. If you find youself constantly explaining the spelling, letting people know that you do, in fact, know that your name is unique, or battling the complex of being branded as having a stripper name; you're not alone. There's all kinds of stuff you can do to change how you feel about your name. The important thing is to acknowledge that your name is part of your identity.
Humans Developed The Ability To Interpret Art Before Symbols

We're seeing a merger of both symbols and art in communication that is unique to modern human history, and it means nothing but great things. After all, art is a universal language. This is why I have more emoji keyboards on my phone than actual keyboards. o(^▽^)o
The Hyper Loop. Fuck Ya.

I can't wait to speed down a frictionless tube.
The Way To Bring Innovation Into Big Companies Is To Take Down The Immune System
Like all functioning bodies, large corporations have mechanisms in place to defend against risks. The problem is, disruption is always a risk.
There Are Pills To Make Women Hornier That Also Make Them Sick

What the actual fuck. Also... many doctors don't study where the clitoris is? WHAT? It's time to learn about women's sexual organs, humanity. Seriously...
You Can Rewire Your Brain To Learn Hard Things Much More Easily If You Focus On Your Uniqueness


Everyone's different. Your challenges to learning a thing are different. The more unique your challenges are, the more unique your path to learning will be.

It's oddly appropriate that the event ended with awesome dancing, something I am painfully bad at. But I'm definitely inspired to try again. In fact, I'm inspired in about a million ways. Thanks, TEDx Toronto!
How To Make a Minecraft Duvet Cover (in case that's a thing you want to do)
Recently I moved into what might be the most grownup place I've ever lived. Unlike my long-term-artist-work-in-progess home in Winnipeg (the one with missing walls, half finished murals, and a Darwinian experiment of a garden), or the commune style warehouse at the Brewery Artist Loft in Los Angeles that was my world last year, my new place in Toronto is insanely respectable. What's more, it has neither roaches nor mice, and I'm sharing it with only one other adult, who may be eccentric but definitely isn't subject to the same moody, defiantly antisocial tendencies as myself, and the other artists I've traditionally shared space with.
I consider this levelling up, in most ways. But I definitely needed to add something personal to the new home. And for the first time in my life, scrawling all over the walls wasn't allowed.

A goodbye message to my Brewery friends when I left Los Angeles, drawn on the wall of the bathroom.
One of the first things we did was get a bed and duvet. The feather duvet had no cover, so except for a little window of time about 2.5 minutes immediately after sweeping, it looked like chickens had recently exploded.
A duvet cover seemed like a pretty cool way to express myself, so I decided to kill two birds with one stone (so to speak - there was evidence of dead birds all over the place already) and design my own duvet cover.
A quick Google search for 'design your own duvet' turned up a cool site called Deny Designs that seemed pretty legit and reasonably priced. Although they didn't have templates, it was pretty easy to Google 'king duvet size' and get the aspect ratio I needed. After that, it was all Photoshop.
My concept was Minecraft, since my boyfriend AC and I both have a pretty hardcore obsession with that particular virtual world. And since I often doodle us as a rabbit and a bear, it made sense to do a couple cute Minecraft animals.
I started by locating reference art online. I used AgentDC7's bear, and the bunny from the Minecraft Wiki page.


I composited these together roughly in Photoshop, projected them on the wall, traced the projection, and painted the tracing in watercolors.

Rough watercolor design

Watercolor design complete
Once that was done, I scanned the watercolor, and combined it with the original reference are and some texture layers to complete the composition. AC located and/or drew all the little item icons.

Composite of watercolor and images sourced online.
This technique allowed me to increase the resolution of the original sampled images by a great deal, because I could blend them with the high res scan of the watercolor and woth a bit of blur, they blended really well. The compositing of paint and 3D renders gives the whole thing a more organic, textured look and feel. Once I'd guessed a bit at the size of the borders and how much space to leave at the too for a folded over sheet, I sent the design to Deny and waited.
It took about a week (they're based in Colorado). Overall, I'm really happy with the result. The fabric's super soft, the print quality is great (I've washed it once and it didn't fade at all), and the colors are really vibrant.
My only change would be to increase the border area at the bottom.

I'll definitely be using Deny Designs in the future. It's a great service. :)

It's important to be passionate about your vision.
8 things JLo taught me about investment pitching that changed my life (probably).
8 important lessons JLo taught me, which I have since included in my presentations (and sometimes also while ordering take-out and giving directions to tourists).
Read More